You've already forked fedora-bootc
Re-worked to support my Gitea environment, along with some other customizations
and removals.

Currently based off of their `silverblue-main` base image, with 1Password and
Tailscale layered.
354 lines
12 KiB
Markdown
354 lines
12 KiB
Markdown
# image-template
|
|
|
|
This repository is meant to be a template for building your own custom
|
|
[bootc](https://github.com/bootc-dev/bootc) image. This template is the
|
|
recommended way to make customizations to any image published by the Universal
|
|
Blue Project.
|
|
|
|
# Community
|
|
|
|
If you have questions about this template after following the instructions, try
|
|
the following spaces:
|
|
|
|
- [Universal Blue Forums](https://universal-blue.discourse.group/)
|
|
- [Universal Blue Discord](https://discord.gg/WEu6BdFEtp)
|
|
- [bootc discussion forums](https://github.com/bootc-dev/bootc/discussions) -
|
|
This is not an Universal Blue managed space, but is an excellent resource if
|
|
you run into issues with building bootc images.
|
|
|
|
# How to Use
|
|
|
|
To get started on your first bootc image, simply read and follow the steps in
|
|
the next few headings. If you prefer instructions in video form, TesterTech
|
|
created an excellent tutorial, embedded below.
|
|
|
|
[](https://www.youtube.com/watch?v=IxBl11Zmq5wE)
|
|
|
|
## Step 0: Prerequisites
|
|
|
|
These steps assume you have the following:
|
|
|
|
- A Github Account
|
|
- A machine running a bootc image (e.g. Bazzite, Bluefin, Aurora, or Fedora
|
|
Atomic)
|
|
- Experience installing and using CLI programs
|
|
|
|
## Step 1: Preparing the Template
|
|
|
|
### Step 1a: Copying the Template
|
|
|
|
Select `Use this Template` on this page. You can set the name and description of
|
|
your repository to whatever you would like, but all other settings should be
|
|
left untouched.
|
|
|
|
Once you have finished copying the template, you need to enable the Github
|
|
Actions workflows for your new repository. To enable the workflows, go to the
|
|
`Actions` tab of the new repository and click the button to enable workflows.
|
|
|
|
### Step 1b: Cloning the New Repository
|
|
|
|
Here I will defer to the much superior GitHub documentation on the matter. You
|
|
can use whichever method is easiest.
|
|
[GitHub Documentation](https://docs.github.com/en/repositories/creating-and-managing-repositories/cloning-a-repository)
|
|
|
|
Once you have the repository on your local drive, proceed to the next step.
|
|
|
|
## Step 2: Initial Setup
|
|
|
|
### Step 2a: Creating a Cosign Key
|
|
|
|
Container signing is important for end-user security and is enabled on all
|
|
Universal Blue images. By default the image builds _will fail_ if you don't.
|
|
|
|
First, install the
|
|
[cosign CLI tool](https://edu.chainguard.dev/open-source/sigstore/cosign/how-to-install-cosign/#installing-cosign-with-the-cosign-binary)
|
|
With the cosign tool installed, run inside your repo folder:
|
|
|
|
```bash
|
|
COSIGN_PASSWORD="" cosign generate-key-pair
|
|
```
|
|
|
|
The signing key will be used in GitHub Actions and will not work if it is
|
|
password protected.
|
|
|
|
> [!WARNING] Be careful to _never_ accidentally commit `cosign.key` into your
|
|
> git repo. If this key goes out to the public, the security of your repository
|
|
> is compromised.
|
|
|
|
Next, you need to add the key to GitHub. This makes use of GitHub's secret
|
|
signing system.
|
|
|
|
<details>
|
|
<summary>Using the Github Web Interface (preferred)</summary>
|
|
|
|
Go to your repository settings, under `Secrets and Variables` -> `Actions`
|
|
|
|
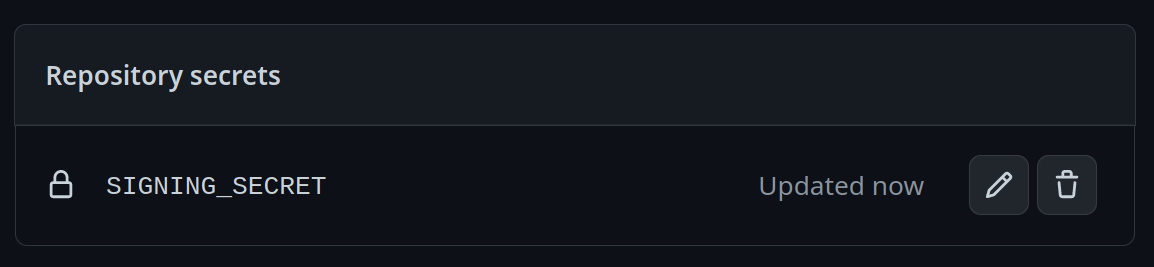
Add a new secret and name it `SIGNING_SECRET`, then paste the contents of
|
|
`cosign.key` into the secret and save it. Make sure it's the .key file and not
|
|
the .pub file. Once done, it should look like this:
|
|
|
|
|
|
</details>
|
|
<details>
|
|
<summary>Using the Github CLI</summary>
|
|
|
|
If you have the `github-cli` installed, run:
|
|
|
|
```bash
|
|
gh secret set SIGNING_SECRET < cosign.key
|
|
```
|
|
|
|
</details>
|
|
|
|
### Step 2b: Choosing Your Base Image
|
|
|
|
To choose a base image, simply modify the line in the container file starting
|
|
with `FROM`. This will be the image your image derives from, and is your
|
|
starting point for modifications. For a base image, you can choose any of the
|
|
Universal Blue images or start from a Fedora Atomic system. Below this paragraph
|
|
is a dropdown with a non-exhaustive list of potential base images.
|
|
|
|
<details>
|
|
<summary>Base Images</summary>
|
|
|
|
- Bazzite: `ghcr.io/ublue-os/bazzite:stable`
|
|
- Aurora: `ghcr.io/ublue-os/aurora:stable`
|
|
- Bluefin: `ghcr.io/ublue-os/bluefin:stable`
|
|
- Universal Blue Base: `ghcr.io/ublue-os/base-main:latest`
|
|
- Fedora: `quay.io/fedora/fedora-bootc:42`
|
|
|
|
You can find more Universal Blue images on the
|
|
[packages page](https://github.com/orgs/ublue-os/packages).
|
|
|
|
</details>
|
|
|
|
If you don't know which image to pick, choosing the one your system is currently
|
|
on is the best bet for a smooth transition. To find out what image your system
|
|
currently uses, run the following command:
|
|
|
|
```bash
|
|
sudo bootc status
|
|
```
|
|
|
|
This will show you all the info you need to know about your current image. The
|
|
image you are currently on is displayed after `Booted image:`. Paste that
|
|
information after the `FROM` statement in the Containerfile to set it as your
|
|
base image.
|
|
|
|
### Step 2c: Changing Names
|
|
|
|
Change the first line in the [Justfile](./Justfile) to your image's name.
|
|
|
|
To commit and push all the files changed and added in step 2 into your Github
|
|
repository:
|
|
|
|
```bash
|
|
git add Containerfile Justfile cosign.pub
|
|
git commit -m "Initial Setup"
|
|
git push
|
|
```
|
|
|
|
Once pushed, go look at the Actions tab on your Github repository's page. The
|
|
green checkmark should be showing on the top commit, which means your new image
|
|
is ready!
|
|
|
|
## Step 3: Switch to Your Image
|
|
|
|
From your bootc system, run the following command substituting in your Github
|
|
username and image name where noted.
|
|
|
|
```bash
|
|
sudo bootc switch ghcr.io/<username>/<image_name>
|
|
```
|
|
|
|
This should queue your image for the next reboot, which you can do immediately
|
|
after the command finishes. You have officially set up your custom image! See
|
|
the following section for an explanation of the important parts of the template
|
|
for customization.
|
|
|
|
# Repository Contents
|
|
|
|
## Containerfile
|
|
|
|
The [Containerfile](./Containerfile) defines the operations used to customize
|
|
the selected image.This file is the entrypoint for your image build, and works
|
|
exactly like a regular podman Containerfile. For reference, please see the
|
|
[Podman Documentation](https://docs.podman.io/en/latest/Introduction.html).
|
|
|
|
## build.sh
|
|
|
|
The [build.sh](./build_files/build.sh) file is called from your Containerfile.
|
|
It is the best place to install new packages or make any other customization to
|
|
your system. There are customization examples contained within it for your
|
|
perusal.
|
|
|
|
## build.yml
|
|
|
|
The [build.yml](./.github/workflows/build.yml) Github Actions workflow creates
|
|
your custom OCI image and publishes it to the Github Container Registry (GHCR).
|
|
By default, the image name will match the Github repository name. There are
|
|
several environment variables at the start of the workflow which may be of
|
|
interest to change.
|
|
|
|
# Building Disk Images
|
|
|
|
This template provides an out of the box workflow for creating disk images (ISO,
|
|
qcow, raw) for your custom OCI image which can be used to directly install onto
|
|
your machines.
|
|
|
|
This template provides a way to upload the disk images that is generated from
|
|
the workflow to a S3 bucket. The disk images will also be available as an
|
|
artifact from the job, if you wish to use an alternate provider. To upload to S3
|
|
we use [rclone](https://rclone.org/) which is able to use
|
|
[many S3 providers](https://rclone.org/s3/).
|
|
|
|
## Setting Up ISO Builds
|
|
|
|
The [build-disk.yml](./.github/workflows/build-disk.yml) Github Actions workflow
|
|
creates a disk image from your OCI image by utilizing the
|
|
[bootc-image-builder](https://osbuild.org/docs/bootc/). In order to use this
|
|
workflow you must complete the following steps:
|
|
|
|
1. Modify `disk_config/iso.toml` to point to your custom container image before
|
|
generating an ISO image.
|
|
2. If you changed your image name from the default in `build.yml` then in the
|
|
`build-disk.yml` file edit the `IMAGE_REGISTRY`, `IMAGE_NAME` and
|
|
`DEFAULT_TAG` environment variables with the correct values. If you did not
|
|
make changes, skip this step.
|
|
3. Finally, if you want to upload your disk images to S3 then you will need to
|
|
add your S3 configuration to the repository's Action secrets. This can be
|
|
found by going to your repository settings, under `Secrets and Variables` ->
|
|
`Actions`. You will need to add the following
|
|
|
|
- `S3_PROVIDER` - Must match one of the values from the
|
|
[supported list](https://rclone.org/s3/)
|
|
- `S3_BUCKET_NAME` - Your unique bucket name
|
|
- `S3_ACCESS_KEY_ID` - It is recommended that you make a separate key just for
|
|
this workflow
|
|
- `S3_SECRET_ACCESS_KEY` - See above.
|
|
- `S3_REGION` - The region your bucket lives in. If you do not know then set
|
|
this value to `auto`.
|
|
- `S3_ENDPOINT` - This value will be specific to the bucket as well.
|
|
|
|
Once the workflow is done, you'll find the disk images either in your S3 bucket
|
|
or as part of the summary under `Artifacts` after the workflow is completed.
|
|
|
|
# Artifacthub
|
|
|
|
This template comes with the necessary tooling to index your image on
|
|
[artifacthub.io](https://artifacthub.io). Use the `artifacthub-repo.yml` file at
|
|
the root to verify yourself as the publisher. This is important to you for a few
|
|
reasons:
|
|
|
|
- The value of artifacthub is it's one place for people to index their custom
|
|
images, and since we depend on each other to learn, it helps grow the
|
|
community.
|
|
- You get to see your pet project listed with the other cool projects in Cloud
|
|
Native.
|
|
- Since the site puts your README front and center, it's a good way to learn how
|
|
to write a good README, learn some marketing, finding your audience, etc.
|
|
|
|
[Discussion Thread](https://universal-blue.discourse.group/t/listing-your-custom-image-on-artifacthub/6446)
|
|
|
|
# Justfile Documentation
|
|
|
|
The `Justfile` contains various commands and configurations for building and
|
|
managing container images and virtual machine images using Podman and other
|
|
utilities. To use it, you must have installed
|
|
[just](https://just.systems/man/en/introduction.html) from your package manager
|
|
or manually. It is available by default on all Universal Blue images.
|
|
|
|
## Environment Variables
|
|
|
|
- `image_name`: The name of the image (default: "image-template").
|
|
- `default_tag`: The default tag for the image (default: "latest").
|
|
- `bib_image`: The Bootc Image Builder (BIB) image (default:
|
|
"quay.io/centos-bootc/bootc-image-builder:latest").
|
|
|
|
## Building The Image
|
|
|
|
### `just build`
|
|
|
|
Builds a container image using Podman.
|
|
|
|
```bash
|
|
just build $target_image $tag
|
|
```
|
|
|
|
Arguments:
|
|
|
|
- `$target_image`: The tag you want to apply to the image (default:
|
|
`$image_name`).
|
|
- `$tag`: The tag for the image (default: `$default_tag`).
|
|
|
|
## Building and Running Virtual Machines and ISOs
|
|
|
|
The below commands all build QCOW2 images. To produce or use a different type of
|
|
image, substitute in the command with that type in the place of `qcow2`. The
|
|
available types are `qcow2`, `iso`, and `raw`.
|
|
|
|
### `just build-qcow2`
|
|
|
|
Builds a QCOW2 virtual machine image.
|
|
|
|
```bash
|
|
just build-qcow2 $target_image $tag
|
|
```
|
|
|
|
### `just rebuild-qcow2`
|
|
|
|
Rebuilds a QCOW2 virtual machine image.
|
|
|
|
```bash
|
|
just rebuild-vm $target_image $tag
|
|
```
|
|
|
|
### `just run-vm-qcow2`
|
|
|
|
Runs a virtual machine from a QCOW2 image.
|
|
|
|
```bash
|
|
just run-vm-qcow2 $target_image $tag
|
|
```
|
|
|
|
### `just spawn-vm`
|
|
|
|
Runs a virtual machine using systemd-vmspawn.
|
|
|
|
```bash
|
|
just spawn-vm rebuild="0" type="qcow2" ram="6G"
|
|
```
|
|
|
|
## File Management
|
|
|
|
### `just check`
|
|
|
|
Checks the syntax of all `.just` files and the `Justfile`.
|
|
|
|
### `just fix`
|
|
|
|
Fixes the syntax of all `.just` files and the `Justfile`.
|
|
|
|
### `just clean`
|
|
|
|
Cleans the repository by removing build artifacts.
|
|
|
|
### `just lint`
|
|
|
|
Runs shell check on all Bash scripts.
|
|
|
|
### `just format`
|
|
|
|
Runs shfmt on all Bash scripts.
|
|
|
|
## Community Examples
|
|
|
|
These are images derived from this template (or similar enough to this
|
|
template). Reference them when building your image!
|
|
|
|
- [m2Giles' OS](https://github.com/m2giles/m2os)
|
|
- [bOS](https://github.com/bsherman/bos)
|
|
- [Homer](https://github.com/bketelsen/homer/)
|
|
- [Amy OS](https://github.com/astrovm/amyos)
|
|
- [VeneOS](https://github.com/Venefilyn/veneos)
|